Installing and Configuring the Bamboo Plugin
The following procedure covers installing and configuring the Bamboo plugin, which requires you to perform actions in both Bamboo and Code Insight.
To install and configure the Bamboo plugin, do the following:
- Extract the Bamboo plugin from the
CodeInsightversionPlugins.zipfile. For more information, see Downloading Plugins. - Access your Bamboo server instance.
- From the Bamboo Administration icon, click Add-ons.
- Click Upload add-on.
- Browse to the
code-insight-bamboo-scan.jarand click Upload. The Bamboo jar file is located wherever the zip file containing the plugins was extracted. - Create a project in Bamboo by creating the plan, adding a job, and then adding a Code Insight Scan task. To create the task, access the FlexNet Code Insight Scan Task Configuration window.
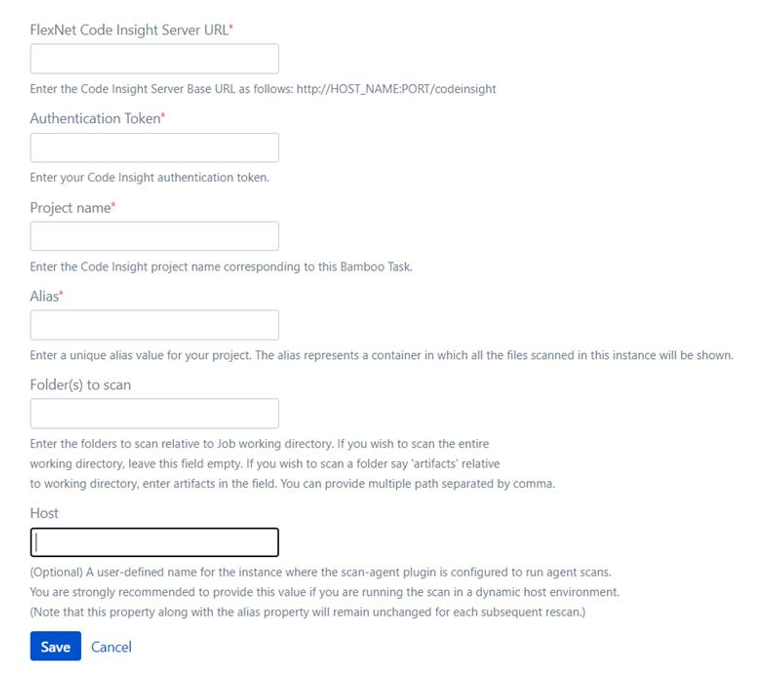
- Enter the following information in the FlexNet CodeInsight Scan Task Configuration window:
-
Task description—A label for this scan task.
-
Disable this task—The option to disable or enable the scan task as needed.
-
Server URL—The URL for the Code Insight core server (for example,
http://codeInsightServer.myorg.org:8888/codeinsight/). -
Authentication Token—The JSON Web Token (JWT) used to authorize user access to the Code Insight functionality. Generate this token using the Code Insight Web UI and then copy and paste it in this field. For more information, see Providing an Authorization Token.
-
Project Name—The name of the project that you created in the Code Insight to associate with this scan task.
-
Alias—A name that you define for the scan-agent plugin. The alias is used to represent the “container” (scan root) under which all the files scanned in this instance will be listed in the API output and in the file tree in the Analysis Workbench. This name must be unique within the project.
-
Folder(s) to scan—The one or more folders to scan. If you want to scan the entire working folder, leave this field blank. However, to scan specific folders in the working directory, list the path for each folder as relative to the working folder, using commas to separate multiple folders.
-
For example, the working directory
opt/atlassian/workingDirectory/projecthas the following source sub-folders: -
/opt/atlassian/workingDirectory/project/source1
-
/opt/atlassian/workingDirectory/project/source2
-
/opt/atlassian/workingDirectory/project/source3
-
/opt/atlassian/workingDirectory/project/source4/source4a
-
To scan the
source1folder only, entersource1. -
To scan both
source1andsource2, enter the following:
-
-
source1, source2- To scan the
source4afolder, entersource4/source4a.
- To scan the
-
Host—(Optional) A user-defined name for the instance where the scan-agent plugin is configured to run scans. This property along with the
aliasproperty will remain unchanged for each subsequent rescan. -
Although optional in general, this value is required if you are running the scan in a dynamic host environment. See Note About Rescans Performed by v2.0 and Later Plugins.
-
- Click
Save. If the Server URL and Token values are correct, the task will be saved. The next time you run the plan, the automated scan of the workspace will be executed for the configured project as part of the plan.noteThe scan task should be placed after the build task in the plan’s task sequence.